Understanding the basics of hand soldering is essential for anyone working with electronics, whether you're a hobbyist or a professional technician. From simple circuits to complex systems, every component must be properly connected, and soldering remains one of the most common methods used in this process.
1. Hand Soldering Tools
Hand soldering requires a few basic tools. The most important one is the soldering iron, which heats up to melt the solder and join components together. Another key tool is the soldering stand, which holds the iron safely when not in use. Other useful items include solder wire, flux, and a damp sponge for cleaning the iron tip.
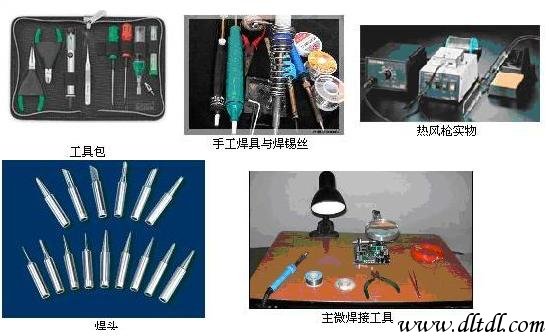
Figure 1: Basic hand soldering setup
2. Conditions for Successful Soldering
To achieve a strong and reliable solder joint, several conditions must be met. First, the materials being joined must be clean and free from oxidation. Second, the correct flux should be used to help the solder flow and bond properly. Third, the temperature of the soldering iron must be appropriate for the task at hand. Lastly, the soldering time should be just enough to allow the joint to form without overheating the components.
3. Solder and Flux Selection
Solder comes in various forms, including solid wires, paste, and lead-free options. Choosing the right type depends on the application and the materials being used. Flux is also critical; it helps remove oxides and improves the wetting action of the solder. However, some fluxes can be corrosive, so they should be cleaned off after soldering to prevent long-term damage to the circuit board.
4. Manual Soldering Techniques
Proper technique is crucial for good results. Hold the soldering iron correctly, using either a pen grip, a standard grip, or an anti-grip depending on the situation. When applying solder, make sure to feed it to the joint from the opposite side of the iron, not directly onto the tip. After melting the solder, remove it first before taking the iron away to avoid disturbing the joint.
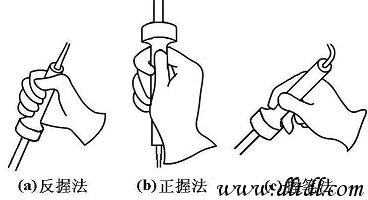
Figure 2: Correct way to hold a soldering iron
5. Common Mistakes to Avoid
Some common mistakes include using too much or too little solder, not heating the joint sufficiently, or moving the components before the solder has fully cooled. These errors can lead to weak joints, poor conductivity, or even complete failure of the circuit. Always take your time and practice regularly to improve your skills.
6. Inspecting Solder Joints
A good solder joint should look smooth, shiny, and have a conical shape. It should also have a small contact angle where the solder meets the metal surface. If the joint appears dull, cracked, or has visible voids, it may be a "cold" or "virtual" solder joint, which can cause intermittent failures in the circuit.
By mastering these techniques and paying attention to detail, you'll be able to create strong, reliable connections that ensure the proper function of your electronic projects. Practice makes perfect, so keep experimenting and refining your skills!
Instrument Controller,Pressure Sensor,Temperature And Humidity Sensor,Control Pressure Sensor
Xiaogan Yueneng Electronic Technology Co., Ltd. , https://www.xgsensor.com