Installation and Structural Diagram of Geomembrane Burst Strength Tester
How to Install and Use the Geomembrane Burst Strength Tester:
1. Pressure Setting: After turning on the power, press the "Set" button and then use the "Back" key to navigate.
Press the "Shift" key to move to the next option, then use the "+" and "-" buttons to adjust the desired value. Once set, press "Back" again to save the changes. After adjusting the lower limit, press "Set" to exit the settings.
2. Peak Pressure Setting: To set the peak pressure (the maximum pressure recorded when the specimen breaks), long-press the "Set" button to save it.
3. Time Window Settings: When entering the setting mode, the display will show "B". If set to "0", it indicates that the peak pressure is retained. You can set any time unit, such as minutes, and the lower limit can be adjusted to 0.1MPa.
4. Time Reset: To restart the test, keep pressing the "-" key without releasing it. The time value will first appear. After 10 seconds, the timer will reset to 0. Be careful not to press "!" accidentally during operation.
5. Time Review: Press the "-" key to view the time in hours, minutes, and seconds. After 30 seconds, the system will return to the pressure display.
6. Time Setting: Long-press the "Set" button for 3 seconds to enter the time-setting mode. The screen will display "T", allowing you to set the pressure increment time in minutes.
7. Zero Adjustment: If the system does not return to zero after starting, press the "Set" button once to reset it. Avoid pressing the "Clear" button while there is pressure; wait until the pressure is released before resetting to zero.
8. Open the water injection cover and fill it with pure water until the tank is full. Start the pressurization process and open the pressure regulator valve to allow water to flow into the high-pressure chamber until it overflows slightly.
9. Place the sample on the rubber ring in the water collector without wrinkles. Remove excess water to ensure no air bubbles are trapped in the clamp. Cover the upper platen and evenly secure the sample.
10. Record the highest pressure value measured during the test as the hydrostatic pressure resistance value of the sample.
11. Calculate the test results according to relevant industry standards.
Schematic Diagram of Geomembrane Burst Strength Tester
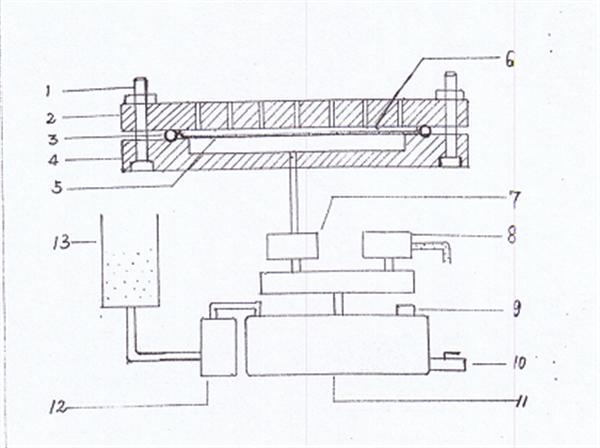
1. Fastening Screw
2. Upper Platen
3. Sealing Ring
4. High Pressure Tank Chassis
5. Steel Mesh
6. Specimen
7. Pressurized Inlet Valve
8. High Pressure Tank Drain Valve
9. Pressure Sensor
10. System Drain Valve
11. Pressure Tank
12. High-Pressure Pump
13. Water Bucket
Orange Circular Cable With SAA approval
Application: Those LV Power Cables suitable for power networks, direct burial, outdoors, indoors and in cable ducts, where not subject to mechanical damage may occur.
Standard applied: AS/NZS 5000.1Rated Voltage: 0.6/1kV
Certificates Approvals: SAA
Others: Fire Cable and other property Low Voltage Power Cable can be available
Orange Circular Cable,Circular Cable,Orange Circular Wires,Circular Wires
Shenzhen Bendakang Cables Holding Co., Ltd , https://www.bdkcables.com